
Blood Donation Guide
Blood Donation keeps hospitals ready for emergencies, surgeries, anemia care, and maternity complications where minutes matter. Even with modern medicine, donated blood and blood components are still essential—and they can’t be manufactured.
This guide covers eligibility and preparation, the blood donation process step by step, safety and side effects, aftercare, and quick FAQs. It’s written for first-time donors and returning donors who want a practical refresher so you can feel confident from check-in to recovery.
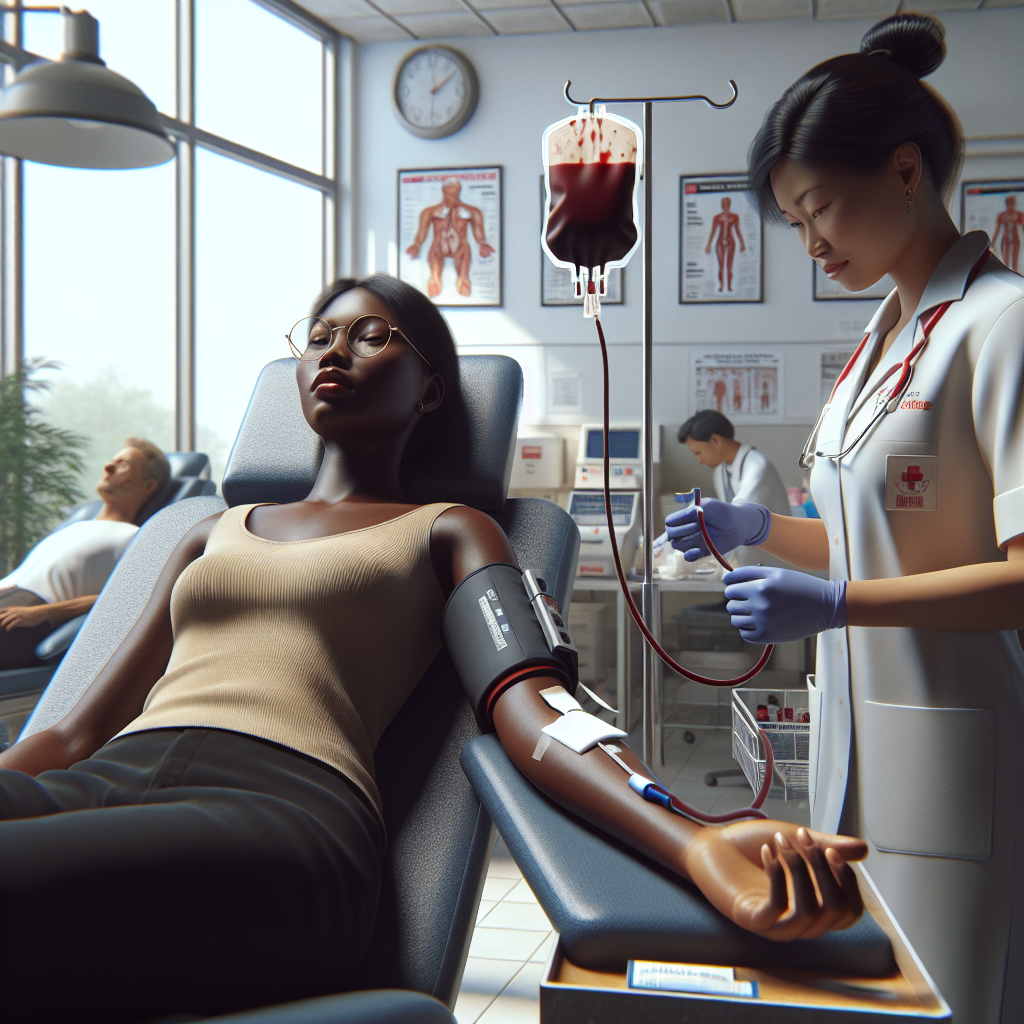
Table of Contents
- What Blood Donation Is and Why It Matters
- Blood Donation Eligibility and Who Should Wait
- The Blood Donation Process: Step by Step
- Safety, Risks, and Common Side Effects
- Aftercare and Recovery: What to Do After Donating
- Pro Tips for a Smooth Donation
- FAQs About Blood Donation
- Conclusion and Next Step
What Blood Donation Is and Why It Matters
Blood Donation is the act of giving blood so it can be tested, processed, and used to treat people who need it. The most common type is whole blood donation, where a standard amount of blood is collected and later separated into parts that help different patients.
Many centers also collect components directly using apheresis, including red blood cells (RBCs), platelets, and plasma donation. Each component has a specific role: RBCs carry oxygen, platelets help blood clot, and plasma contains proteins that support clotting and immunity. Matching blood types matters for safe transfusions, so maintaining a steady supply across blood types is critical.
Demand is driven by trauma and accidents, cancer treatment, elective surgeries, and obstetric hemorrhage during childbirth. Shelf life also creates urgency: red cells are stored for weeks, while platelets are typically usable for only days, so regular donors help prevent shortages.
If you want a practical way to find reputable donation drives and see community needs, a blood donation platform can help connect donors with nearby opportunities.
For foundational information on blood safety and why donation systems matter, see the World Health Organization (WHO) blood safety guidance.
Blood Donation Eligibility and Who Should Wait
Donor eligibility rules vary by country and center, but most programs share a core checklist: you should generally meet the local age range, weigh at least the minimum requirement, and feel well on the day of donation. A brief screening checks vital signs and a finger-stick hemoglobin level to confirm it’s safe for you to donate.
Some people are asked to wait temporarily due to medical or behavioral factors. Common deferrals include a recent fever or infection, low hemoglobin, pregnancy and postpartum timing, recent tattooing or piercing, certain medications, recent travel, or a recent vaccination. Policies can change based on local disease risk and blood supply safety, so it’s always best to confirm donation requirements with your blood center before you go.
Practical readiness also matters. Bring a valid photo ID (and a donor card if you have one), drink water beforehand, and eat a normal meal so screening and donation go smoothly.
Common reasons to postpone donating
- Fever or active infection — Typical wait: until symptoms resolve and you’re fully recovered — What to do next: rest, hydrate, and donate when you’re well.
- Low hemoglobin — Typical wait: often weeks (center-specific) — What to do next: ask about recheck timing; focus on iron-rich foods and follow clinical guidance if advised.
- Pregnancy or recent delivery — Typical wait: postpartum deferral varies — What to do next: follow center rules and your clinician’s advice.
- Recent tattoo or piercing — Typical wait: depends on local regulations and facility standards — What to do next: confirm the waiting period with your donation center.
- Recent travel — Typical wait: varies by destination and timing — What to do next: disclose travel history during screening.
- Recent vaccination — Typical wait: depends on vaccine type and local policy — What to do next: bring vaccination details and ask the center for guidance.
The Blood Donation Process: Step by Step
Knowing what will happen can reduce anxiety and help you plan. Most visits follow a predictable flow, and staff guide you through each step.
What happens on arrival
You’ll start with registration, where your ID is checked and your contact details are confirmed. You’ll complete a brief health history questionnaire and review consent forms. Some centers allow pre-registration or appointment scheduling, and tools like a blood donation app in India can support booking, reminders, and follow-up notifications where available.
Mini health check (screening)
Before donation, staff typically check temperature, pulse, and blood pressure. A quick finger-stick hemoglobin test helps confirm you have enough red blood cells to donate safely. If anything is outside the safe range, you may be asked to wait and try another time.
The donation itself
You’ll be seated comfortably while the donation site is cleaned. A sterile, single-use needle is used, and the process is monitored by trained staff. Whole blood donation often takes about 8–12 minutes for collection, while the full visit (including screening and recovery) commonly takes under an hour. The typical volume collected is around one standard unit, which is designed to be safe for eligible donors.
Post-donation recovery at the center
After the needle is removed, the site is bandaged. You’ll usually be offered a snack and fluids and asked to rest briefly for observation. This recovery time helps reduce the chance of dizziness and ensures you feel stable before leaving.
What happens to your blood next
Your donation is tested, typed, and often processed into components so it can help more than one patient. Units are labeled, stored under strict conditions, and distributed to hospitals and clinics as needed.
Donation day timeline checklist
- Arrival — check in and confirm ID.
- Screening — questionnaire, consent, vital signs, hemoglobin test.
- Donation — sterile setup and collection.
- Recovery — bandage, snack, hydration, short observation.
- Testing/processing — typing, screening tests, component preparation, distribution.
For a detailed overview of screening and donation steps, see the American Red Cross eligibility and donation guidance.
Safety, Risks, and Common Side Effects
Many people ask, “is blood donation safe?” For most eligible donors, it is considered very safe when performed at a reputable center. Safety controls include trained staff, careful screening, strict sanitation, and single-use collection equipment.
Common side effects are usually mild and short-lived. You may feel lightheaded, tired, or notice some bruising at the needle site. These symptoms often improve with rest, fluids, and a snack. Mild soreness is also possible, especially if you use the arm heavily right after donating.
Rare risks include fainting with a possible fall-related injury, nerve irritation near the needle site, or infection (very uncommon when proper sterile technique is used). Contact the center or a clinician if you have persistent bleeding, worsening swelling, increasing redness or warmth, fever, severe pain, or repeated fainting after you leave.
If you’re nervous about discomfort, try slow breathing, looking away during the needle placement, and using a calming distraction like conversation or music if the site allows it.
Aftercare and Recovery: What to Do After Donating
Good after blood donation care helps you feel normal faster and reduces side effects. Think in three time windows: the first hour, the rest of the day, and the next 24–48 hours.
Do / Avoid checklist
- Do (first hour): drink fluids, eat the provided snack, and keep the bandage on as instructed. Sit or lie down if you feel dizzy.
- Avoid (first hour): smoking or alcohol immediately after donating, since they can worsen lightheadedness and dehydration.
- Do (same day): hydrate steadily, take breaks, and be cautious when standing up quickly.
- Avoid (same day): heavy lifting or strenuous exercise, especially using the donation arm.
- Do (next 24–48 hours): prioritize rest and balanced meals with iron foods and protein to support recovery.
Focus on hydration and nutrition. Iron-rich foods (like lean meats, beans, lentils, leafy greens, and fortified cereals) and vitamin C–containing foods can support iron intake. If you notice persistent bleeding through the bandage, severe pain, or signs of infection at the site, contact the donation center or your clinician promptly.
Pro Tips for a Smooth Donation
- Hydrate well starting the day before; include electrolytes if appropriate so you arrive with good blood volume and are less likely to feel lightheaded.
- Eat a balanced meal 2–3 hours before; avoid very fatty foods because heavy fats can affect some blood tests and may leave you feeling sluggish.
- Wear a short-sleeve/loose sleeve top; bring ID and donation card to speed up check-in and make access to your arm easy.
- Use muscle tension/leg-cross technique if you tend to feel faint by gently tensing leg and core muscles during and after collection, as staff instruct.
- Plan a low-activity day; arrange transport if you’re a first-timer so you can rest and respond safely if you feel tired afterward.
FAQs About Blood Donation
What is Blood Donation and how often can I donate?
Blood Donation is giving blood so it can be used for transfusions or processed into components like red cells, platelets, or plasma. How often you can donate depends on the donation type and local rules; many programs allow whole blood every several weeks, while some component donations may be permitted more often. Always follow your blood center’s guidance.
Does blood donation hurt?
Most people feel a brief pinch when the needle is inserted and mild pressure during collection. Discomfort is usually minimal, and staff can adjust positioning if you feel pain.
Can I donate blood if I’m on medication?
Some medications are compatible with donating, while others require a temporary deferral for donor or patient safety. Disclose all medications and supplements during screening so the center can make the right decision.
What should I eat after donating blood?
Drink fluids and eat a balanced meal with iron and protein (for example, beans or lean meat with vegetables). Avoid alcohol right away, and keep snacking if you feel tired or lightheaded.
Conclusion and Next Step
Donating can make a direct difference for patients who need transfusions for trauma, cancer treatment, surgeries, or childbirth complications. If you meet donor eligibility basics, understand what to expect during screening and the blood donation process, and follow safe aftercare and recovery steps, most people find the experience straightforward. Blood Donation is also supported by strong safety practices like single-use equipment and trained staff, with side effects that are usually mild and manageable with hydration and rest.
To find reputable opportunities and stay informed about community needs, you can use a blood donation platform for donors as one option alongside official blood centers.
Call to Action
Check your local blood center’s eligibility checklist and schedule a donation appointment when you’re well-rested and hydrated.